Conveniences of using LastPass

This post is intended for few of my friends, to whom I promised to explain how to save time and make their life better and information more secure at the same time.

Some of you saw me when I was logging in to LastPass with YubiKey and I promised to give detailed explanation.

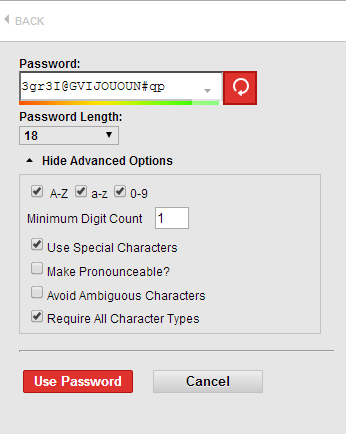
In few words, LastPass is service that enables you to keep all your passwords, credit cards information, notes etc securely encrypted, and you access all of that information using single password (Last Pass that you will have to remember). It comes with plugins for most browsers, which automatically fills your login information when and where you need it. It also had password generator which can generate passwords of given complexity on key-press (shortcut is Alt+G):

Screenshot 2014-04-30-22-01-43-3304169

That means that you don’t have to use one password for multiple web sites, and if one of them gets hacked, others are still secure because they had different passwords.

To install LastPass, just go to their site and download it, you will have to register there with your email and Last Pass, and then when you download it wizard will ask you to import your passwords from your current browser.


Second great thing about Last Pass is their mobile app, which enables you to have your secure passwords on your mobile smart phone (smartphones are not really mobile anymore, until I got spare battery for mine, I was constantly connected to some power source). It has integrated browser that you can use for opening web sites combined with password management, but real deal is Last Pass Premium (1$/month), which then uses one of more recent features on Android – draw UI over other apps, and with that offers to fill password in Chrome and other browsers for Android, in your e-banking app, in your social network apps, everywhere. You can associate sites to apps in Android, and when you tap password field it automatically shows dialog to fill login information, or if it cannot find input fields, then you have option to copy username and password and paste into fields. I cannot give you screenshots of these as my phone says that it cannot capture them, because they are “DRM protected images”.

Third part of this post is YubiKey. It is hardware dongle that your computer sees as USB keyboard. It generates one-time password (every time different) that enables same security like token generator for e-banking. When you configure LastPass to use YubiKey, it will ask you for token every time you sign into a new browser (or every time if you don’t tick “trust this computer”). Advantage of using YubiKey is that makes your LastPass account much more secure, as it requires 2-factor authentication: something that you know (password), and something that you have (yubi key). In case that you are accessing your LastPass vault from computer that has i.e. keylogger, someone might get a hold of your password, but YubiKey code is unique, and it cannot be used more than once, so it cannot access your account without it.

However, YubiKey is not only way to give additional security to your LastPass account:
Screenshot 2014-04-30-22-44-52-9146121

Instead of YubiKey, you can use Google Authenticator or some other 2-factor authentication option, but reason why I especially like Yubi is that it is very high quality device (virtually indestructible) and you can have 5 of them associated with your LastPass, so that when you loose one, you can just disassociate it from LastPass. Bear in mind that Yubi is only usable in combination with LastPass Premium.

It is also possible to copy YubiKey seed from one key to another so that they are exchangeable (two keys act as one), but that is something risky unless you keep one in a secure safe and need it only to access something in case you loose first one. But, as soon you loose one, whatever it protects is compromised, and this makes sense only for special scenarios. In my opinion it is better to have different keys associated with one LastPass, as it supports it, and you can disable it as soon as you loose it. Loosing one of two identical generators can sometimes happen without you knowing about it.

Anyway, now that you know about it, first step is to get LastPass. Try it. If you like it, then you can decide if you want Yubi. Standard version comes with one slot configured for Yubi auth, and second empty. For same price (25$) you can also get YubiKey VIP, it gets with preconfigured Symantec VIP authenticator that you can associate to PayPal etc, to log in without LastPass. In second slot you get standard Yubi auth, and only downside is that when you want to use it is that you need press token few seconds longer.

As an added bonus, for any of your sites, credit cards etc. that you keep in LastPass vault, you can share with another user! This is much better way to exchange credit card information than to send it through email (or any other standard communication channel).

Disclaimer: I use affiliate links. If you register for Last Pass through links in this blog, both you and me get month of LastPass Premium for free!

Why uptime on WP7 cannot be longer than 24.9 days?

This morning I saw in System View on my Samsung Omnia 7 that uptime is “more than 24.9 days”, and boot time is “earlier than 30-Dec-11 13:07:24”. At first I was amazed, how can it be “earlier than”, and how that reference in time is not fixed (it was 29-Dec yesterday). Then I realized that phone does not “remember” its time of boot, but has some sort of incrementing register for counting uptime, and it hits its limit on 24.9 days. It would be interesting for how long this phone can work without reboot, as it seems very stable, but it seems that cannot be known without manual recording of boot time Disappointed smile.

I did some calculations, and it seems that phone is using SIGNED int as register value which counts number of MILISECONDS since boot. As 25 days has about 2’160’000’000 milliseconds, and 2^31 is 2’147’483’648, it starts to seem logical where did number 24.9 days came from Nerd smile. It is logical that boot time itself is not recorded, as there it would be a possibility of reporting “fake” uptimes by setting the clock on the phone. However, in my opinion, method used is also not optimal.

So, what could be better here? Light bulb

– For start, it could be unsigned int, so the OS would be able to keep track for more than 49 days of uptime.
– It could also count seconds instead of milliseconds, that would make possible to count more than 1300 years of uptime Smile, or if for some reason needs to keep milliseconds (i.e. does not want to break all existing functionalities?), unsigned long (int64) could be used (although I don’t remember if it is available in WP7), to give overkilling amount of almost 585 millions of years Hot smile.

All this considered, it seems that 49 days would be enough, change would not break anything, and it requires changing only one variable declaration.

Solution for VHD_BOOT_HOST_VOLUME_NOT_ENOUGH_SPACE error in windows 8

If you are using VHD method of installing windows 8 to virtual disk on physical machine (Scot Hansellman has great tutorial: http://www.hanselman.com/blog/GuideToInstallingAndBootingWindows8DeveloperPreviewOffAVHDVirtualHardDisk.aspx) and you get VHD_BOOT_HOST_VOLUME_NOT_ENOUGH_SPACE error after installation, then your problem is probably dynamic VHD and not enough free space on disk containing that drive. I had the same problem, and googling for it did not solve it, as there is one little catch that is not very known:

You need to have enough free space on physical disk containing VHD that it can contain whole VHD IF IT WOULD GROW TO MAXIMUM DECLARED SIZE! So 100GB VHD on a 90GB free space is a no-go, it does not matter that Windows 8 will use only about 11GB after clean installation.

Windows 8 setup does not check for this, so you may be able to install it, and not able to boot it 🙂

Log on to windows as a local user without computer name

Yes, you all know that you can use computername\user or 192.168.x.y\user, or even domain\user when logging on to machine.

But, when you want to login as local user and don’t know computer name, and do not want to type IP address, you can use any\user where any can be anything.

Nice little security flaw?

ASP.NET MVC3 app (part 1) – Entity Framework and code first

How often you need to have cascading choices on UI in order to make your application user friendly? In my experience, almost every modern application has some form of hierarchy, and that is where cascading dropdowns are used. But, I want to make this less repetitive and more elegant. So, let’s begin. In first part (this) I will create an simple web app using entity framework code-first and make simple model which will be used for creating this functionality. It is one speedy run-through of new features, without advanced topics, so mind some bad practices, this blog post is not about good programming, first part is for MVC3/.NET 4 beginners with experience with older versions of MVC and .NET.

It will be an mvc3 razor internet application:

image

With latest MVC tools update there are already almost all necessary NuGet packages installed in new project:

image

I will just update all of jQuery packages as they have updates at the moment, and add EntityFramework.SqlServerCompact (NuGet will add dependencies), so SQL server won’t be needed.

As this is demo app, I will put everything into single project. It will be an product catalogue.

This is data model:

image

Central object will be product model (I will use vehicles domain), which has type, version, trim level and manufacturer. Simple enough. Objects on diagram are simple POCO objects with collection properties marked as virtual, so entity framework can override them and inject DynamicProxy objects for lazy loading.

This will be my repository:

image

For this DbContext to work, I need to do one more thing – to put connection string into my web.config:

image

As I don’t want to create test data every time I change my model, I can use database initializer class to create test data (this is useful for unit testing):

image

And this is it. I now have database and data. Actually, I will have it when I start my application, if I add this to global.asax:

image

To test this, I will use controller autoscaffold feature of new MVC tools update:

image

This will autocreate controller and all views Smile. After this action, starting app and visiting http://localhost:57095/Manufacturer will give:

image

Note that only manufacturers for which I created Models are in database. This is because I only added Models, and EF added all related objects, and BMW was not among them.

Using auto scaffold I created controllers for all model objects in couple of minutes.

This is end of part 1, I now have application which will I use to create unobtrusive cascading dropdowns. In the next part I will make cascading dropdown loading using standard methods (jQuery and ajax).

For more info about EF Code First, visit

http://www.hanselman.com/blog/SimpleCodeFirstWithEntityFramework4MagicUnicornFeatureCTP4.aspx

and

http://weblogs.asp.net/scottgu/archive/2010/07/16/code-first-development-with-entity-framework-4.aspx

UPDATE: Added part 2