This blog is now being hosted from raspberry pi from my office

Over last few years I have been playing with raspberry pi devices for several purposes, one of them being 3d printer (OctoPi is great), but also for testing apps I want to run on Linux.
Using raspberry is one-time investment, and swapping different machines is as easy as swapping SD card, so I decided to dedicate one of them for hosting this blog.

Right now it runs off Raspberry 3b+ with 1GB of RAM. I added small heatsinks to it and put it into one compartment of IKEA Kallax in my office. I use it to house my network switch and NAS drives, and to avoid overheating in closed space, I installed ventilation.

Back side of Kallax insert with holes has 140mm fan:

It seems this insert is not available globally, but you could use some other that has enough airflow on front, like this one.

Make sure you put an dust filter on the back side, to avoid devices clogging up and overheating.

I used this

To supply fan and raspberry with power, I added multi-USB charger, 5V to 12V DC-DC step-up-converter (to get 12V out of 5V USB line) and an Noctua NA FC1 4 Pin PWM Fan Control Unit so I can lower the speed of the fan (reduce noise).

For software, I use Ubuntu Server 18.04 for Raspberry 3, with Webmin, NGINX and MySql. WordPress runs on NGINX through php-fpm.

I keep my install scripts on Github so it is easy to reinstall/make another pi.

I am currently setting up an Raspberry 4 with 2GB RAM and Ubuntu Server 20 running off an SSD. I want to use that as my server, but I wanted to run WordPress in Docker container and I still did not set up connecting that WordPress to MySql server which is outside of container in a way that I am happy with.

Remake of cascading dropdowns with KnockoutJS: Part 2 – cascading behavior

This post is second part of series started here.

Starting point is this changeset on GitHub.

If you don’t want to go through all these steps manually, you can download finished code sample produced in this post from this changeset on GitHub and fiddle with it while reading this post.

In previous post, I created custom Knockout binding, named remoteOptions that accepts url of http service as parameter and loads options from that service instead from view model. That can help to reduce amount of code responsible to build reference data that needs to be available to user to choose from, as with this binding you have one piece of ~10 lines of code for all dropdowns that always have same content. This does not get me very far, as, at least on projects where I worked on, most of the dropdowns were dependent on something, i.e. some attribute of currently viewed set of information, or some other information that user already entered in current form (i.e. when user chooses Female gender, you might want to remove Mr. from title dropdown etc).

Just for reference, I’m adding current state of custom binding, where I left it on GitHub:

Screenshot 2014-05-13-20-26-59-4598210

As there are two dropdowns (category and subcategory), I want to make second one depend on first (load it when user chooses value in first based on that value). For that, I will change binding so that it tells what parameters I want to pass to my service on configured url:

Screenshot 2014-05-13-22-30-59-3084533

I want to pass id of selected category to my service as parameter named ‘category’ and I want to tell that to my binding with parameters:{ category: categoryId }. Now, I have to make sure that my view model has this categoryId defined and pointing to Id of category:

Screenshot 2014-05-13-23-43-46-7844669

Note that this view model is just an JavaScript object made on the fly for this demo, if you are working on a big application that may have large (or even composite) view models, maybe with inheritance, please read this great article about prototypes in JavaScript which will help you better understand how to use new keyword in JavaScript and properly build your models.

Back to cascading dropdowns, now I have Id value of currently selected category in categoryId property (computed, so that it will automatically update after every change in first dropdown). If I go now to my binding and inspect its value when it is processing this dropdown by setting breakpoint after binding is assigned from valueAccessor() (if you set breakpoint, let it execute first time when is processing first dropdown), I see that I have category here as observable:

Screenshot 2014-05-13-22-38-09-0020760

dependentObservable is function name that is remnant of pre-2.0 version of Knockout, and now is same as computedObservable.

To make my subcategory options dependent on category, I will create subscription that is refreshed when any of parameters is refreshed, and then use it to reload data from server when that happens by subscribing refreshOptions function to it in init binding handler:

Screenshot 2014-05-14-23-25-59-1980099

The catch here is in when any of parameters is refreshed, as parameters are passed from binding as names of properties on view model, and binding contains references to their observables. That means that parametersChangeListener computed observable will automatically get new value and notify its subscribers whenever user causes change to any of subscribed observables (in this case categoryId which is indirectly updated by changing selection in category dropdown).

Return value of parametersChangeListener will always be plain JSON object, because every of observables is read with ko.unwrap, which will also support any non-observable variables without problems. That makes it suitable for direct pass to getJSON (you might want to use post here instead, for example to prevent caching response, or to have your http endpoint better secured).

If I try to run it now, I can see that subcategories are filtered based on selected category:

Screenshot 2014-05-14 23.37.33 Screenshot 2014-05-14 23.37.40

Best of all is that this subscription is generated automatically, from whatever is configured in binding, and you can have as many linked dropdowns as you want, they refresh automatically and track changes on their parents.

Every time when I change category, binding makes new ajax request and loads corresponding items for dependent dropdown:

Screenshot 2014-05-14-23-35-38-0394038

Screenshot 2014-05-14-23-35-47-3420418

So, there is cascading part of behavior. Source code is here.

I’m a little busy right now with search for new apartment and relocation, but I will try to continue this series and further improve what we have here.

Till next time!


Remake of cascading dropdowns with KnockoutJS: Part 1 – creation of custom bindings

One of all-time most popular articles on this blog is AJAX  Cascading Dropdown (actually whole series), which still receives lot of attention even after 3 years.

Not surprising, as this is universal problem that is always present, and any business has some kinds of categories and groups of its own, with more or less levels deep.

Small aside to prevent wasting your time: if you are advanced KnockoutJS user, then you might want to wait for next article of this series, where I will be improving binding from this one to add cascading interactions. This post is more detailed and suited for developers who had only used default bindings that come with KnockoutJS, without many customization.

As browsers advanced, and got closer and closer to a common standard, jQuery became less and less necessary, and other frameworks emerged to address problems of a mess that very often gets produced when many developers try to produce “rich client” UI with jQuery. Hard-coded ids, storing variables in hidden fields to communicate between client and server (and even to communicate between different JavaScript “modules” when there is no real modularity and dependency injection), global functions and variables that are shared between in-line JavaScript and referenced files… you name it. Don’t get me wrong, I am aware that it IS possible to produce something clean and maintainable using jQuery and its plugins, and if you happen to be one of these people who knows how to do it, just think about how easy is to find team of developers who know the same? And even if only benefit of MVVM and data-binding frameworks would be avoiding of copy-pasting selectors all over the place and removing hidden fields, it would be worth learning them, so it is not surprise that they are now so popular for client-side development in JavaScript.

So, these two facts, popularity of my first post about jQuery version of cascading dropdowns, and popularity of Knockout are obviously good clue for me that people are solving same problem today with Knockout, and this is why I decided to create new, updated version of my initial blog post, this time with KnockoutJS. For any of you asking why KnockoutJS and not some other library, my answer is that is first data-binding library I learned couple years back, and even if it is not my favorite anymore, I still like it, it is being used on most of projects I work on, and I believe it won’t go away just yet, so with many people using it and continuing to use it in future, I believe that this article will provide quality content for my readers. And, besides that, I’ll make AngularJS version next :).

So, goal of this series of articles is to implement support for series of dropdowns that are depending on each other (choices avalable in some of them depend in chosen values in others), with items being loaded from remote service, and dependencies between them being managed automatically. All of that should be simple to use and reusable, meaning that no new code needs to be written when you use it 5, 10 or 50 times. To make that work, I will create custom binding. If you never created custom binding, I hope that this article will give you all necessary guidance to be able to create other bindings, depending on your needs.

In this, first article, I’m going to make step-by-step guide on how to implement part of this feature as custom knockout binding, which loads items from server, but without cascading behavior (so multiple dropdowns, no interactions between them), and at the end you have link to source code if you just want to quickly add this binding to your project and (hopefully) solve at least one of your problems. By reading it, you will also find out about my approach to creation of custom bindings.  I derived it after years of experience in creating them, and I believe it is good, as it allows you to add one small tweak at a time, and you always know if a line you added breaks something. Obviously, there are always areas to improve, and if you have some tips, feel free to share them in comments. Custom bindings tend to be pieces of code you don’t write every day, so you usually forget how they work, and what are arguments for handlers. Therefore, taking this iterative approach is what I usually do when I see that I need new binding, if I haven’t created one yesterday (so that I remember all this stuff and can skip baby steps).

If you don’t want to go through all these steps manually, you can download finished code sample produced in this post from this changeset on GitHub and fiddle with it while reading this post.

To reduce overhead for getting some base to work on, I will use ASP.NET MVC5 with Bootstrap 3.1.1 LESS template for Visual Studio. This template gives you already working application with decent css where I can start implementing this (almost) immediately. Only missing prerequisites that I need to add are knockout and ko lite tools:

PM> Install-Package knockoutjs
PM> Install-Package KoLite

To start with, I’m cleaning up index page, adding reference to knockout and activity plug-in from ko lite tools (that we don’t need yet, but when options are loaded with ajax, some form of feedback for user will be necessary), and creating one select to bind with some options:

Screenshot 2014-05-11-16-37-33-8117064

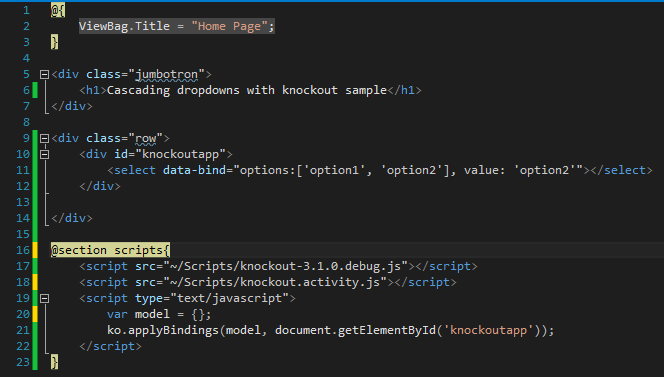
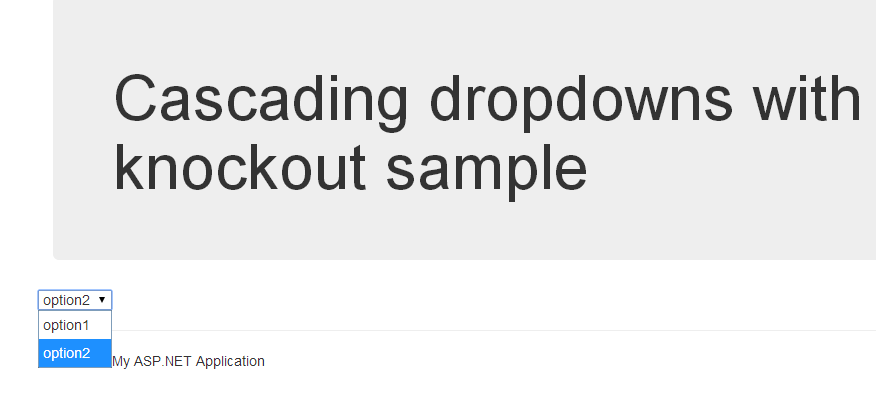
If you didn’t know, you can hardcode your data when using knockoutjs bindings, and model is here just because I plan to use it, but this already produces dropdown with two options, second being selected:

Screenshot 2014-05-11 16.38.13

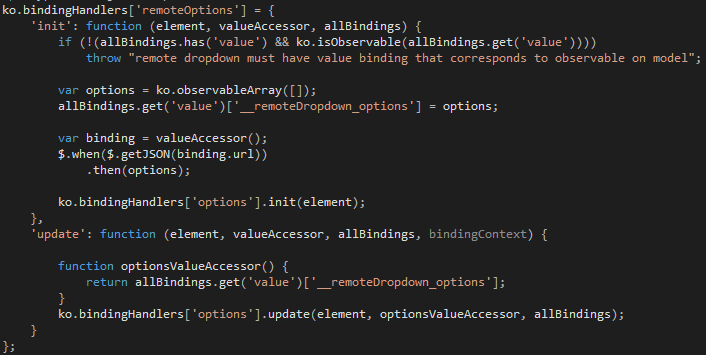
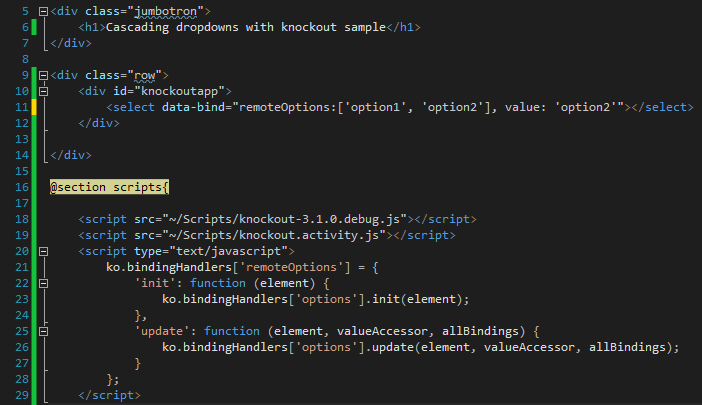
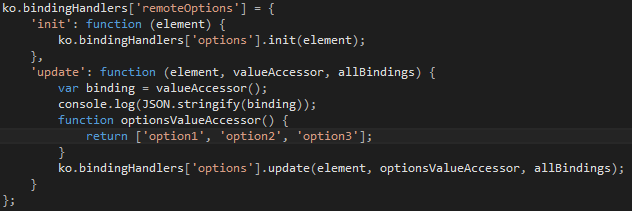
Now, on to create custom binding. As I want to display some options, that will be loaded using ajax, good place to start is default ‘options’ binding that comes with knockout. For start, you can create your alias for it (pass through call to options binding without changing/adding anything), and then run application to make sure all still works as before. So, I created ‘remoteOptions’ binding and used it instead of ‘options’ to check if all works as expected:

Screenshot 2014-05-11-16-43-54-4084819

If you don’t know how bindings in Knockout work, here is very short explanation for arguments that are passed to your handler:

  • element is DOM element of page that contains data-bind attribute for your binding,
  • valueAccessor is function that returns object assigned to your binding in data-bind attribute,
  • allBindings is an object that contains all parsed bindings from data-bind attribute.
  • bindingContext an object that contains and $data property that represents your current model (i.e. model that you used in applyBindings, or current item in foreach binding, or property that was used in with binding), but also $parent, $parents and $root properties where you can access other parts of your model (traverse up from current node)

For more details, read documentation.

So, my goal is to tell my binding where to load options from and avoid having either options or remote address in my view model. That reduces number of properties and lists in view model, and in many cases has effect of making view model much more like (data) model reducing mapping complexity, or removing mapping completely. So, having that in mind, first step will be to change binding syntax (I also changed html and added some css but that is just markup, important part is in red):

Screenshot 2014-05-11-20-40-36-5560672

This now passes an object instead of array of options, and to avoid ko options binding being broken with it, I’m changing my custom binding, just a little bit:

Screenshot 2014-05-11-20-37-08-8765880

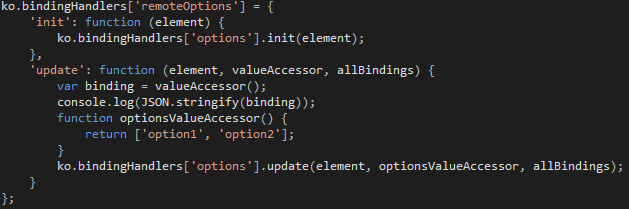
As you can see, I’m reading new binding by calling valueAccessor() and at the moment doing nothing except logging its content to console to show you what is in:

{“url”:”categories/get”}

At same time, I created function optionsValueAccessor (actually just moved hard-coded options here) to provide some options that default binding will read and use to display options in select element:

Screenshot 2014-05-11-20-44-44-3633127

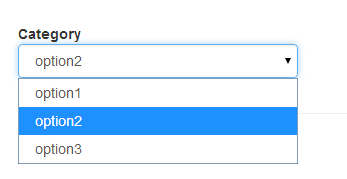
I added another option now, and it can be seen in page:

Screenshot 2014-05-11 20.45.42


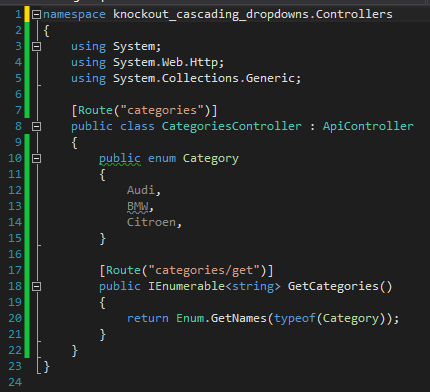
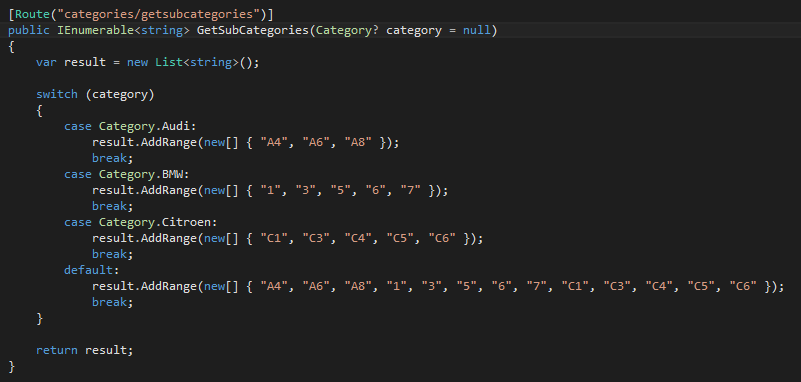
Ok, that part seems to be simple enough, now to get some real options using ajax. For that, I’m exposing very simple http service in web app to return contents of an enum (in real app you would probably read that from some kind of persistence service):

Screenshot 2014-05-11-21-18-35-2731914

So, I want to load list from this http service automatically as options in Category dropdown when page is loaded (and binding initialized), and to accomplish that, I want to have minimal amount of coding configuration, and that would be address of endpoint that contains options for dropdown:

remoteOptions:{ url:’/categories/get’ }

That is rather easy to accomplish with knockout, as we can pass reference to an observable array to underlying default options binding which will show options from that observable array, and set its items once ajax request has been completed. Single problem is that we have to make that ajax call in init method of bindingHandler, as they need to be loaded only once, update is triggered every time user selects item from dropdown, and every time update is triggered, we need to pass same observable array to underlying options binding (no need to refresh all items when selecting one of them). I noticed that passing reference from init to update handlers is not simple, as you can’t write to allBindings (well, you can, but it doesn’t get persisted anywhere, next time when update is called, you get new object without your changes), and you cannot write to value of your property in model, as it is supposed to hold value user has selected (having something else defeats purpose of this blog post). Fortunately, value binds to observable, which is a function, and in JavaScript everything is object (including function), so we can simply add a property to that object (observable, function) that will hold reference to observable array with options:

Screenshot 2014-05-11-21-46-16-5793210

To reduce probability of interference with something else that may be in observable function/object, I tried to give unique name to my property: ‘__remoteDropdown_options’ (if I used something like ‘options’ here, somebody else might used same property name for something else and then if both bindings are used at same time they would read/write different thing in/from same place, and there might be very weird and hard to track down bugs). As you can see, I’m setting it to observable array in init, and firing off an ajax request to load options from url passed in binding. Reference to that same options observable array is returned as result of optionsValueAccessor in update function that initializes dropdown. When ajax request completes, options is filled with result from server, and voila, my dropdown contains these values:

Screenshot 2014-05-11 21.52.44


That is kinda cool (especially because with these 10 lines of code you can fill in any dropdown with ajax), but, there is still no trace of “cascading” from title of this post. And, not to mention that in most cases description shown in dropdown will differ from value (i.e. you will have item’s primary key as value, and description as text shown to user). So, let’s add that before trying to add cascading behavior (because that is short and easy, and this post already becomes very long, too long for binding of 10 lines).

First, instead of list of strings, return list of objects that have Id and Text:

Screenshot 2014-05-11-22-09-16-8232341

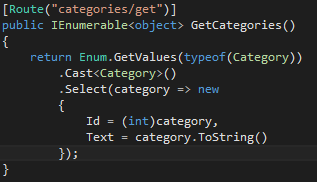
That makes controller now return array like this:

Screenshot 2014-05-11-22-10-32-2292066

But dropdown now shows three [object Object] items instead of text. Fortunately, we are passing through allBindings untouched to knockout’s default options binding, which already has support for this (read documentation for details). To use this feature, I just need to tell knockout what is name of my text property: optionsText:’Text’. Now is right time to add category as property on my view model to be able to show what is selected:

And yes, that is view model. I know that some of you are going to have hard time to accept that I did not define view model in C#, but it is intentional, not only for this sample, it can be avoided completely. You have view model here, and I believe one is enough. Keep it simple. You don’t need it even when you are accepting your domain entity in controller (when you are saving it), you can define model binder to initialize everything that you need, effectively avoiding one layer of view model classes and mappers (mapper does the same your model binder would do, but you need to add code to call it into your controller, and why do that when MVC already has extensibility point for that?) This is a topic for separate post (still in drafts folder), but feel free to comment about it here.

So, with this here, I’m changing markup to reflect latest change in options that are returned from server, and with having observable to store category in view model, I’m going to show it on screen:

Screenshot 2014-05-11-22-24-44-7241307


As you can see, when using remoteOptions, you can use optionsText as with default options binding to choose property to display in dropdown, and value (selected item from dropdown) is bound to category.

As I did not set optionsValue, knockout will set whole object (with both Id and Text) into category observable, and you can see that from with binding and results below:

Screenshot 2014-05-11-22-59-06-0916130Screenshot 2014-05-11-22-59-11-0249004Screenshot 2014-05-11-22-59-16-2570130

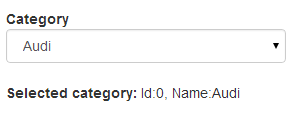
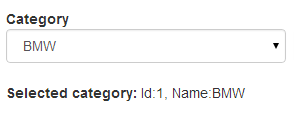
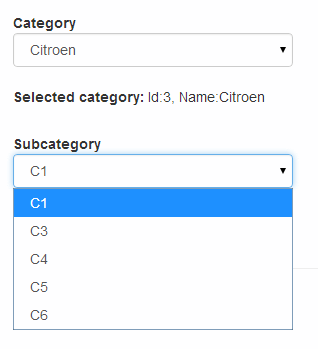
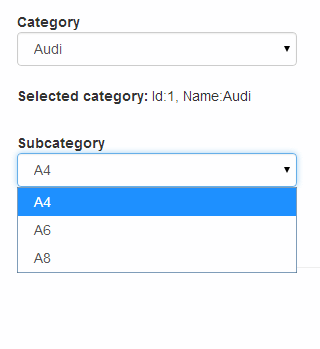
These are 3 screenshots of same dropdown with different option selected, as you see, it automatically shows chosen category below.


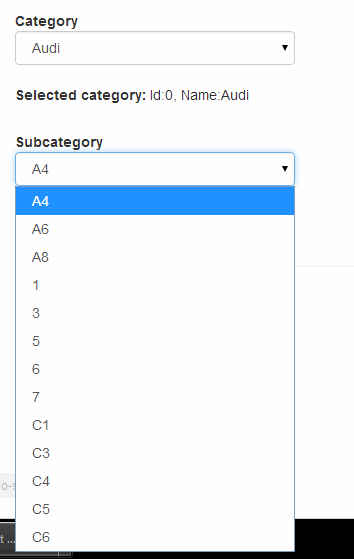
So, to conclude this first part, I’m going to add another dropdown, with subcategories (that should be filtered by category selected in first dropdown, but not yet). For that I need another http service to get data from, and another html markup for dropdown:

Screenshot 2014-05-12-11-37-26-4778034 Screenshot 2014-05-12-11-37-11-4936759


So, for this dropdown, different label, different url, and different property in vew model (I have added subcategory: ko.observable()). That produces:

Screenshot 2014-05-12 11.37.35  Screenshot 2014-05-12-11-36-51-8104404


With this, I’m ending this post, and source code changeset on GitHub is exactly the place where I’m starting next post, in which I will add dependencies between these dropdowns and filter items in “children” based on selected items in “parents”.

P.S. One of additional purposes of this article is also to document/explain feature that I implemented on my latest project, binding which works on same principles as this, and anyone having trouble understanding it can come here for help. Even if I’m sad that my code requires additional explanation, it is still a good way to celebrate successful migration to new domain for my blog.

Conveniences of using LastPass

This post is intended for few of my friends, to whom I promised to explain how to save time and make their life better and information more secure at the same time.

Some of you saw me when I was logging in to LastPass with YubiKey and I promised to give detailed explanation.

In few words, LastPass is service that enables you to keep all your passwords, credit cards information, notes etc securely encrypted, and you access all of that information using single password (Last Pass that you will have to remember). It comes with plugins for most browsers, which automatically fills your login information when and where you need it. It also had password generator which can generate passwords of given complexity on key-press (shortcut is Alt+G):

Screenshot 2014-04-30-22-01-43-3304169

That means that you don’t have to use one password for multiple web sites, and if one of them gets hacked, others are still secure because they had different passwords.

To install LastPass, just go to their site and download it, you will have to register there with your email and Last Pass, and then when you download it wizard will ask you to import your passwords from your current browser.


Second great thing about Last Pass is their mobile app, which enables you to have your secure passwords on your mobile smart phone (smartphones are not really mobile anymore, until I got spare battery for mine, I was constantly connected to some power source). It has integrated browser that you can use for opening web sites combined with password management, but real deal is Last Pass Premium (1$/month), which then uses one of more recent features on Android – draw UI over other apps, and with that offers to fill password in Chrome and other browsers for Android, in your e-banking app, in your social network apps, everywhere. You can associate sites to apps in Android, and when you tap password field it automatically shows dialog to fill login information, or if it cannot find input fields, then you have option to copy username and password and paste into fields. I cannot give you screenshots of these as my phone says that it cannot capture them, because they are “DRM protected images”.

Third part of this post is YubiKey. It is hardware dongle that your computer sees as USB keyboard. It generates one-time password (every time different) that enables same security like token generator for e-banking. When you configure LastPass to use YubiKey, it will ask you for token every time you sign into a new browser (or every time if you don’t tick “trust this computer”). Advantage of using YubiKey is that makes your LastPass account much more secure, as it requires 2-factor authentication: something that you know (password), and something that you have (yubi key). In case that you are accessing your LastPass vault from computer that has i.e. keylogger, someone might get a hold of your password, but YubiKey code is unique, and it cannot be used more than once, so it cannot access your account without it.

However, YubiKey is not only way to give additional security to your LastPass account:
Screenshot 2014-04-30-22-44-52-9146121

Instead of YubiKey, you can use Google Authenticator or some other 2-factor authentication option, but reason why I especially like Yubi is that it is very high quality device (virtually indestructible) and you can have 5 of them associated with your LastPass, so that when you loose one, you can just disassociate it from LastPass. Bear in mind that Yubi is only usable in combination with LastPass Premium.

It is also possible to copy YubiKey seed from one key to another so that they are exchangeable (two keys act as one), but that is something risky unless you keep one in a secure safe and need it only to access something in case you loose first one. But, as soon you loose one, whatever it protects is compromised, and this makes sense only for special scenarios. In my opinion it is better to have different keys associated with one LastPass, as it supports it, and you can disable it as soon as you loose it. Loosing one of two identical generators can sometimes happen without you knowing about it.

Anyway, now that you know about it, first step is to get LastPass. Try it. If you like it, then you can decide if you want Yubi. Standard version comes with one slot configured for Yubi auth, and second empty. For same price (25$) you can also get YubiKey VIP, it gets with preconfigured Symantec VIP authenticator that you can associate to PayPal etc, to log in without LastPass. In second slot you get standard Yubi auth, and only downside is that when you want to use it is that you need press token few seconds longer.

As an added bonus, for any of your sites, credit cards etc. that you keep in LastPass vault, you can share with another user! This is much better way to exchange credit card information than to send it through email (or any other standard communication channel).

Disclaimer: I use affiliate links. If you register for Last Pass through links in this blog, both you and me get month of LastPass Premium for free!

Nancy on OWIN – bundling and minification

Continuing with changeset from last time.

I want to introduce bundling and minification without dependency on System.Web (it would defeat purpose of trying to create site on OWIN).

For that, I’m using SquishIt:

Install-Package SquishIt

I found some resources how to use it in Asp.Net Mvc and there is also integration manual on Nancy documentation, none of them is covering case when Nancy is running outside of IIS (and without Razor engine, which I don’t believe it is necessary for this simple example, I might want to add it if I see that I need it, but I want to try to go without it), but they are good samples to see how to use SquishIt API. For bundling, I need bootstraper, which is equivalent of Global.asax.cs in Asp.Net application, and as I want to do minimal customizations, I will use default bootstrapper as base for mine:


I’m taking care of bundling itself in separate class, BundleConfig, as Bootstapper is place where all of initialization is performed, and if all that stuff is inside it will become very dirty and cluttered in notime:

Bundle config

I’m separating JavaScript and Css bundling, and within JavaScript, creating one bundle for all libs (and only angular is in it), and another for my “app” where I put whatever js is in app folder.

To keep things simple, and continue using html view, which can only replace tokens from passed view model, I’m going to reference these bundles and pass them to view from my HomeModule:

Bundles added to viewmodel

That produces already complete html tags, so that I can only write them directly in view:

Result:

As a side note, take a good look on contents of this file. You can see that WelcomeCtrl was minified, and minifier used (MsMinifier) did shortening of controller dependencies (which was just ‘$scope’ in this case). Take care when writing applications in Angular to explicitly identify dependencies (by defining modules in array, with dependency names as strings first, then your module as last element of array, like here, “$scope” is a string, and minification does not change it). That allows Angular’s injector service to identify your dependencies and inject them even when minifier performs obfuscation of argument names to reduce amount of characters used.

SquishIt works by taking all of files added to bundle, and packing them together into another file,  that will have given name. If you want to leverage browser caching, then you need to add “#” to file name, and it will be replaced with a “token”, that looked to me as hash at first, but I figured that it must be just a random guid, as it did recreate scripts combined js file without changing any of contents, so it just creates a file with random guid in name and remembers it under given name for lifecycle of application instance.

That is very simple approach, as then all that need to be done is render include tag that references that file name as source, and when something is changed, new file name and url will be created, so no outdated files will be used, and no browser cache will cause problems. It seems very simple and effective, but don’t do it like this! This is just a step to learn how it works, and while it seems fine, it is not the simplest thing that could possibly work. It will create new file every time application is restarted, and if you are hosting your application, you may not be able to control app pool life cycle, which may have rather conservative life policy. If your application works good and you don’t have to check on it, it may generate hundreds of hundreds of these minified files. Another, even more dangerous problem is that I placed my minified scripts file into same directory with other files, while at same time including whole that directory into bundle! That means every time when app pool is recycled, new bundle will be created with all files, and previous bundle(s), effectively doubling size of app folder on every start of application. This exponential progression can go undetected while doing test run of application, because angular tends to be pretty resilient, and even if you redefined some modules few times, it will work, but after couple dozens of restarts, size of served JavaScript can grow to megabytes, effectively killing browser, and eating your outgoing bandwidth on server. And taking your hard drive space. All of that can be pretty expensive. You understand now why I wrote don’t do it in red, it is very dangerous to use it, even if you put your minified file into another folder, you can forget, or someone else who needs to change something will see how bundles are defined and put it there not knowing how it works, or your hosting provider might decide to migrate your web site to new server and reset permissions in process, so you end up with:

What is another reason to avoid it, is that while compilation debug=”true” is set in web.config, SquishIt works same as standard bundling from Microsoft.Optimization, and will not do any minification, it will serve resources unchanged, as in manual version from start of this post, with only difference being that you don’t have to manually include every file from app folder. That makes developer life much easier, but if you don’t deliver version every day (it is as easy as defining publish profile and configuring server for web publishing, and publish in release mode), it will hide this problem until very late in development life cycle. You may figure out something is wrong if you disable debug and then re-enable when you see minified version being picked up too:


So, I hope that by now I convinced every single reader that read to this point, that this approach should not be used for serious application. Ever. This can be avoided by using caching of minified resources in memory. It is faster, doesn’t cause hit to hard drive on every request, it does not require write permissions for application pool account, and does not leave any files behind that must be cleaned up. There is already example in Nancy doc, under Advanced – Diskless Caching.

Based on that example, I created my BundlesModule:

This module is working from /bundles subpath, and also uses GZip to compress outgoing stream, and adds etag and Cache-Control headers to leverage browser caching. In debug mode I intentionally reduced caching to 45 seconds, so even if you create bundle with .ForceRelease to enable minification in debug mode, it won’t be cached for long as you will probably be changing files.

To be able to use dynamic parameters type, I had to add reference to Microsoft.CSharp.

As name of bundle is now passed as part of url ({name} part after /bundles/js/), creation of bundles must be changed accordingly, as they were created with different names:


Bundle name is now encoded into url in place where BundleModule expects {name} parameter, so rendered url will point back to that module, and pass bundle name that needs to be served:

Screenshot 2014-04-17-00-28-24-4817544


There is no more writing to disk, no need for permissions, and we have bundling solution that is as effective as one from Asp.Net Mvc.

Source code is at github, as usual. From here there are many things that need to be done to make one application, and I still have not decided what to do first. If you have suggestions, please leave a comment. Thanks!